Top 10 Ways to Wire Multiple LED Flood Lights in Parallel?

Time:2026-09-19 Author:Amelia
0%

Wiring several LED flood lights in parallel can create brighter, more flexible outdoor lighting. It can also expose weak points quickly. A loose terminal, undersized cable, or mismatched driver may cause flickering, heat, or nuisance breaker trips.

The U.S. Department of Energy reports that LED products can use at least 75% less energy than incandescent lighting and last much longer. However, efficiency does not remove electrical design risks. Each flood light still needs the correct voltage, current, polarity, and protection. Parallel wiring keeps each fixture connected across the supply, so one failed lamp can often remain isolated while the others continue operating. That sounds simple. It is not always simple.

This guide explains how to wire multiple led flood lights in parallel, from circuit planning to final testing. It focuses on load calculations, cable sizing, junction-box layout, weather protection, and driver compatibility. The National Electrical Manufacturers Association emphasizes suitable enclosures and reliable connections for demanding environments. The U.S. Department of Energy’s Solid-State Lighting program also highlights thermal management as a key factor in LED performance and service life. These points matter near wet walls, metal poles, and exposed roof edges.

A practical example helps. Five 50-watt, 120-volt fixtures draw about 250 watts before system losses. The actual current may differ with power factor and driver efficiency. Check the nameplate.

Some installations fail because the plan assumes every LED driver behaves identically. That assumption needs testing. Follow local electrical requirements and have a qualified electrician verify the finished circuit, especially outdoors or on mains voltage.
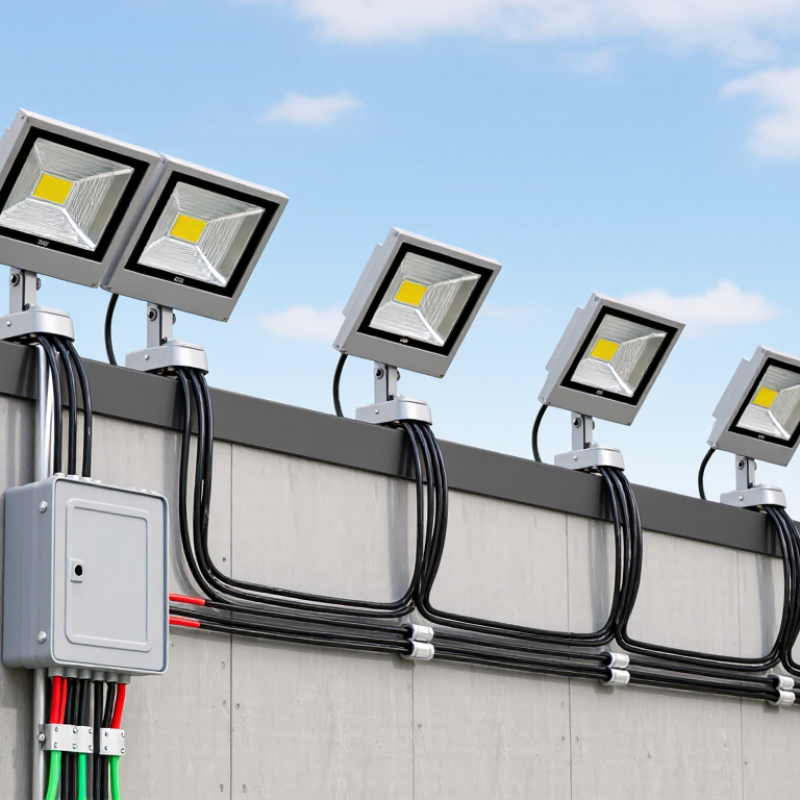
Top 10 Ways to Wire Multiple LED Flood Lights in Parallel?

Understanding Parallel Wiring for Multiple LED Flood Lights

Understanding Parallel Wiring for Multiple LED Flood Lights

Parallel wiring gives every LED flood light the same supply voltage. Each fixture operates independently, so one failed light should not darken the entire row. The total current, however, equals the sum of every fixture’s current. Five 2-amp lights require approximately 10 amps before safety margins. A qualified electrician should verify circuit capacity, conductor size, grounding, and overcurrent protection against local electrical codes.

Use a properly rated junction box, then connect each fixture across the same live, neutral, and grounding conductors. Keep branch connections short and secure. Long outdoor runs can create voltage drop, especially with thin cable. Measure voltage at the first and last fixtures. A difference above the fixture manufacturer’s tolerance signals a wiring problem. Do not assume identical-looking drivers have identical requirements.

The International Energy Agency reports that lighting uses about 15% of global electricity, making efficient installation worthwhile. The U.S. Department of Energy’s Solid-State Lighting research reports also emphasize driver reliability, thermal control, and system efficiency. These details matter beside a wet wall or a hot roof. Weather-rated enclosures and sealed cable entries are essential. I once underestimated startup current on a grouped circuit; the breaker nuisance-tripped. That mistake was avoidable. Recheck inrush current, dimmer compatibility, and emergency switching before closing the box. Parallel does not mean unlimited.

Selecting Compatible Lights, Cables, Switches, and Power Supplies

Wiring multiple LED flood lights in parallel keeps each fixture at the rated supply voltage. Compatibility must come before cable selection. Match voltage, frequency, color temperature, and driver type. Do not mix constant-voltage fixtures with constant-current models. Dimming systems also need compatible switches and drivers. The U.S. Department of Energy’s 2023 Solid-State Lighting R&D Opportunities report discusses LED package efficacies above 200 lumens per watt in laboratory conditions. Laboratory figures can mislead. Outdoor fixtures lose output through optics, heat, dirt, and poor installation. Select lights with similar wattage and verified outdoor ratings.

Calculate total current by adding every fixture’s wattage, then dividing by system voltage. Add practical capacity, preferably about 20 percent, for startup variation and future expansion. The power supply should exceed the calculated load and provide stable output. Use copper cable with insulation suited to outdoor temperature, moisture, and sunlight. Longer runs may need larger conductors. Many electrical design guides target voltage drop below 3 percent. That target is easy to overlook. Use a switch rated for the circuit’s voltage and current, not merely the lamp wattage. A properly rated fuse or circuit breaker should protect the cable. The International Energy Agency’s Energy Efficiency 2023 report estimates lighting represents about 15 percent of global electricity consumption, making efficient design worthwhile. I would still verify every terminal after testing; loose connections remain a surprisingly common failure.

Top 10 Ways to Wire Multiple LED Flood Lights in Parallel? - Selecting Compatible Lights, Cables, Switches, and Power Supplies

The configurations below are intended for compatible low-voltage LED flood lights. Every light is connected across the same supply voltage, while each branch receives the required voltage independently.

No. Parallel Wiring Method Compatible Light Type Example Load Recommended Power Supply Cable Recommendation Switch or Relay Protection Expected Voltage-Drop Risk Best Application
1 Single central distribution block 12 V or 24 V constant-voltage flood lights 4 × 30 W = 120 W Same voltage, at least 150 W; approximately 10 A at 12 V or 5 A at 24 V Supply trunk: 2.5 mm² copper; branch circuits: 1.5 mm² copper DC-rated switch rated above the total current; use a relay for larger loads Fuse each branch separately; add one main fuse close to the power supply Low when branch lengths are similar General-purpose installations with several lights in one area
2 Daisy-chained power bus with parallel tap-offs Low-voltage lights with clearly marked polarity 6 × 20 W = 120 W 24 V supply rated for at least 150 W; approximately 6.25 A nominal load 2.5 mm² copper bus; reduce to 1.0–1.5 mm² for short branch leads One DC switch or relay rated for at least 10 A at 24 V DC Install a fuse at the supply and verify that the bus cable ampacity exceeds the fuse rating Medium because voltage may fall toward the last tap Linear rows of lights where the first-to-last distance is moderate
3 Star wiring from a fused junction box 12 V or 24 V LED flood lights 8 × 15 W = 120 W 24 V, 150 W minimum; allow additional capacity for startup and temperature effects 2.5–4 mm² copper feeder; 1.0–1.5 mm² individual branches Central switch or relay; select a DC rating greater than the calculated current One correctly sized fuse per branch and a main disconnect Low because each branch has a similar path length Large outdoor layouts requiring balanced brightness
4 Separate switched groups Same-voltage lights grouped by zone 2 groups of 4 × 25 W = 200 W total 24 V, at least 250 W; approximately 8.3 A at full load 4 mm² main feeder; 1.5–2.5 mm² group circuits Two DC-rated switches or relays; each group should have its own current rating Individual group fuses plus a main fuse and disconnect Low when each group is sized independently Driveways, yards, or buildings requiring independent lighting zones
5 Dedicated fuse-and-switch branch for every light Multiple identical or mixed-wattage low-voltage lights 5 × 40 W = 200 W 12 V, at least 250 W; approximately 16.7 A at full load 2.5 mm² copper feeder; 1.0–1.5 mm² per-light branch, depending on length Individual DC-rated switches, or a multi-channel relay panel One fuse per light; fuse rating should protect the branch cable and device Low and faults are easier to isolate Serviceable systems where individual control and troubleshooting matter
6 24 V distribution with local buck converters 12 V lights supplied from a 24 V system through approved converters 6 × 20 W = 120 W output 24 V supply of at least 150 W, plus converter efficiency allowance; use converters rated above each load 2.5 mm² copper at 24 V; short 12 V output leads of 1.5 mm² or larger Switch the 24 V input with a DC-rated switch or relay Fuse the 24 V feeder and each converter input; protect converter outputs as specified Low over long runs because current is lower at 24 V Long cable runs where 12 V voltage drop would otherwise be excessive
7 Constant-voltage supply with PWM dimmer Dimmable 12 V or 24 V LED flood lights 4 × 25 W = 100 W Same voltage, at least 125 W; PWM controller current rating should exceed 100 W ÷ system voltage 2.5 mm² copper feeder; branch size based on current and distance PWM dimmer or controller rated for the full connected load; do not use an AC-only dimmer Main fuse, branch fuses, reverse-polarity protection, and adequate heat dissipation Medium if the controller is undersized or poorly ventilated Adjustable architectural, security, or landscape lighting
8 Photocell or timer controlled parallel circuit Constant-voltage LED lights compatible with automatic controls 10 × 10 W = 100 W 12 V or 24 V supply rated at least 125 W 2.5 mm² copper main cable; 1.0–1.5 mm² branches for short runs DC-rated photocell or timer; use an interposing relay if control output current is insufficient Fuse near the supply, weatherproof enclosure, and surge protection where appropriate Low when the automatic controller is correctly rated Dusk-to-dawn security and outdoor area lighting
9 Remote relay or contactor controlled distribution High-power 12 V or 24 V flood lights 6 × 50 W = 300 W 24 V supply rated at least 375 W; approximately 12.5 A at full load 4–6 mm² copper feeder; 1.5–2.5 mm² branches according to length Small control switch driving a DC-rated relay or contactor; contacts must exceed total current Main fuse, branch fuses, flyback suppression for relay coils, and a lockable disconnect where required Medium unless feeder length and connection quality are controlled High-output systems controlled from a distant switch location
10 Redundant dual-feeder parallel distribution 24 V lights divided between two independently fused feeders 12 × 20 W = 240 W 24 V supply rated at least 300 W; divide the lighting load evenly between feeders Two 4 mm² copper feeders; 1.0–1.5 mm² branches as required One main DC-rated switch or separate switches for each feeder Separate feeder fuses, branch fuses, common disconnect, and clearly labeled polarity Low when the load is balanced and cable lengths are similar Large installations where reduced voltage drop and easier maintenance are priorities

Design note: Calculate total current as total wattage ÷ system voltage, then select a power supply with approximately 20–25% spare capacity. Use only cables, switches, fuses, connectors, enclosures, and power supplies rated for the actual voltage, current, temperature, and outdoor conditions. For mains-voltage flood lights, follow local electrical regulations and have the installation checked by a qualified electrician.

Planning the Circuit Layout and Calculating the Total Electrical Load

Top 10 Ways to Wire Multiple LED Flood Lights in Parallel

Planning the Circuit Layout and Calculating the Total Electrical Load

Parallel wiring keeps every flood light at the same supply voltage. Draw the layout before pulling cable. Mark the power source, junction boxes, switch, and each fixture.

Use ten practical checks: confirm voltage, record wattage, calculate current, size conductors, verify breaker capacity, allow voltage-drop margin, inspect driver compatibility, manage inrush current, seal outdoor connections, and label every branch.

For example, ten 50-watt lights consume 500 watts. At 120 volts, the calculated load is 4.17 amps. A continuous-use design may require 125% loading, producing 5.21 amps. Follow the applicable electrical code and the fixture’s nameplate data.

The U.S. Department of Energy reports that LED lighting uses at least 75% less energy and lasts up to 25 times longer than incandescent lighting. Lower energy use does not remove wiring risks. LED drivers can create short starting surges, and long cable runs can reduce voltage.

Keep branch lengths practical. Measure voltage at the farthest fixture. A distribution box can make testing and future maintenance easier. I still recheck every connection. A clean drawing can hide a poor terminal.

Tips: Balance fixtures across branches when possible. Use outdoor-rated boxes, glands, and connectors. Confirm total ampacity with NFPA 70 requirements. Never rely only on fixture count; calculate watts, volts, current, and the actual installation conditions.

Connecting LED Flood Lights in Parallel Step by Step

Connecting LED flood lights in parallel keeps each light connected directly across the same power supply. Each fixture receives the full rated voltage. This usually gives steadier brightness than series wiring.

Turn off the circuit at the breaker, then verify zero voltage with a tested meter. Check every flood light’s voltage, wattage, and outdoor rating. Add the wattages together before selecting the circuit. Divide total watts by supply voltage to estimate running current. Leave extra capacity for startup and temperature changes.

I prefer a weatherproof junction box with separate terminals for live, neutral, and ground conductors. Run one supply cable into the box, then connect each light branch to the same terminals. Match polarity carefully. Connect ground wires securely.

Use cable rated for the installation environment and sized for the current and cable length. Protect outdoor connections from water, condensation, and physical damage. A residual-current device or ground-fault protection may be required by local rules. Do not rely on wire colors alone. They can be wrong after previous repairs. I have learned to photograph connections before closing the box, because small wiring mistakes become difficult to trace later.

Restore power only after checking every terminal and tightening point. Test each light separately, then observe all lights together for flickering, heat, or nuisance trips. If one fixture fails, the others should normally remain lit. That behavior confirms the parallel layout. A qualified electrician should inspect unfamiliar wiring or high-voltage installations. Safety deserves more than a quick guess.

Testing, Troubleshooting, and Maintaining the Completed Installation

Testing, Troubleshooting, and Maintaining a Completed Parallel LED Flood Light Installation

After wiring multiple LED flood lights in parallel, switch off the circuit and inspect every junction box. Check for loose terminals, damaged insulation, reversed polarity, and moisture near outdoor fittings. A voltage tester should confirm the circuit is dead before touching conductors. Then restore power and test each light separately. All fixtures should receive the same rated voltage and produce steady brightness. Flickering often points to a loose connection, an overloaded circuit, or an unsuitable control device. Do not guess. A qualified electrician should test mains-voltage faults.

Tips: Use a clamp meter to compare the circuit’s actual current with its expected load. Record the readings. This creates useful evidence during future maintenance. If one fixture fails while others remain lit, inspect its branch connection, driver, and grounding path. If every light becomes dim, check the supply voltage and total cable length. Heat deserves attention. After thirty minutes, carefully inspect accessible connectors for unusual warmth, discoloration, or odor. Never touch exposed live parts.

Clean lenses with a soft, damp cloth every few months, especially near dust, salt, or vehicle exhaust. Tighten accessible fasteners without crushing the housing. Replace cracked seals promptly. I have found that small water marks often appear before a complete failure. My earlier mistake was checking brightness but ignoring cable temperature. That test was incomplete. Keep a simple maintenance log with dates, voltage readings, faults, and repairs. It makes recurring problems easier to identify.

FAQS

Why are LED flood lights wired in parallel?

Parallel wiring gives each light the same supply voltage. One failed fixture usually does not switch off the others. Check every branch connection carefully.

How do I calculate the total electrical load?

Add the wattage of every fixture. Then divide the total watts by the system voltage. Ten 50-watt lights equal 500 watts. At 120 volts, the load is about 4.17 amps. Allow roughly 20 percent extra capacity.

What should I check before choosing lights and cables?

Match voltage, frequency, color temperature, and driver type. Do not mix constant-voltage and constant-current fixtures. Choose cables for outdoor heat, moisture, and sunlight. Long runs may require larger conductors.

How can I reduce voltage drop?

Keep cable runs practical and use suitable conductor sizes. Many designs target voltage drop below 3 percent. Measure voltage at the farthest fixture. A light may look acceptable while receiving reduced voltage.

What power supply and switch are suitable?

Choose a power supply that exceeds the calculated load. It should provide stable output during normal operation. The switch must match the circuit voltage and current. Do not size it only by lamp wattage.

What protection does the circuit need?

Use a correctly rated fuse or circuit breaker. It should protect the cable and match the circuit capacity. Confirm total ampacity under applicable electrical requirements. A fixture count alone is not enough.

How should I test a completed installation?

Switch off the circuit and inspect every junction box. Check loose terminals, damaged insulation, reversed polarity, and moisture. Verify the circuit is dead before touching conductors. Restore power and test each light separately. Never touch exposed live parts.

What causes flickering or uneven brightness?

Flickering may indicate a loose connection, overload, or unsuitable control device. If one light fails, inspect its branch, driver, and grounding path. If all lights dim, check supply voltage and cable length. Do not guess. Use measured readings.

How can I maintain outdoor flood lights?

Clean lenses with a soft, damp cloth every few months. Inspect seals, connectors, fasteners, and cable insulation. After thirty minutes, check accessible connectors for heat or discoloration. Small water marks can appear before failure. I once checked brightness but ignored cable temperature. That test was incomplete.

Conclusion

Wiring multiple LED flood lights in parallel allows each fixture to receive the full supply voltage and operate independently, making the system practical for outdoor lighting and large areas. This guide explains how to wire multiple led flood lights in parallel by first choosing lights, cables, switches, and a power supply with matching voltage ratings and suitable weather protection. It also covers how to plan cable routes, identify connection points, and calculate the combined electrical load so the circuit remains within the power supply and wiring capacity.

The installation process includes connecting each flood light to the same positive and negative supply lines, securing all terminals, and protecting connections from moisture. After wiring, test the circuit systematically, checking brightness, switch operation, voltage, and signs of overheating or loose connections. The guide also highlights troubleshooting methods and routine maintenance, such as inspecting cable insulation, cleaning light surfaces, and reviewing connections periodically. For safety, power should be switched off during installation, and a qualified electrician should be consulted when the circuit is complex or uncertain.

Amelia

Amelia

Amelia is a seasoned marketing professional with a wealth of expertise in our company’s core offerings. With an unwavering passion for driving growth and innovation, she plays a pivotal role in shaping our marketing strategies and enhancing brand visibility. A key aspect of her responsibilities......